One of the bigger differences for me as I was learning Swift and starting to code with this new language was getting into a new flow where I style my code a bit differently to let the compiler help me accomplish my goals and enforce complete code.
An Example, with bugs
So, here’s a little example of a situation I’ve run thru a number of different ways, complete with some bugs! ?
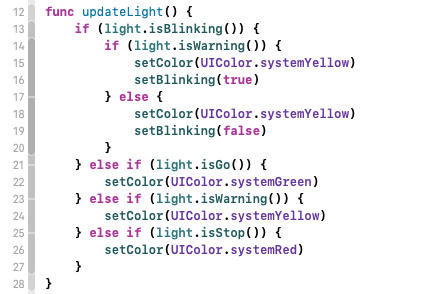
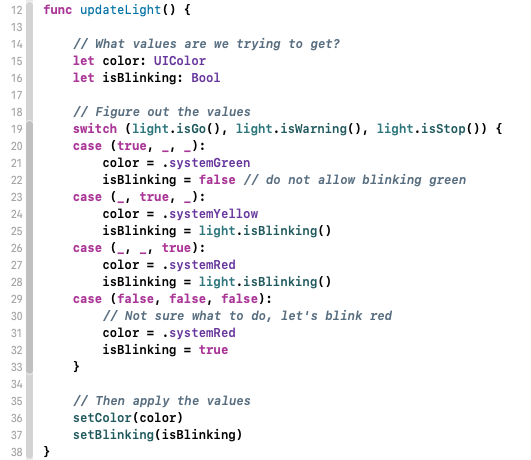
In Figure 1, we have an updateLight() function. This function is responsible for setting a stoplight to be either red (stop), yellow (caution/slow), green (go), blinking red (stop, then proceed), or blinking yellow (yield, proceed with caution). (Note: these are my descriptions and not any official definitions for what the lights mean, so please consult your local rules of the road and not my blog).
This has a few bugs you might have spotted already. For one thing, we can never set the light to blinking red. For another, once we start blinking, we never stop!
So, let’s fix a few of these problems…
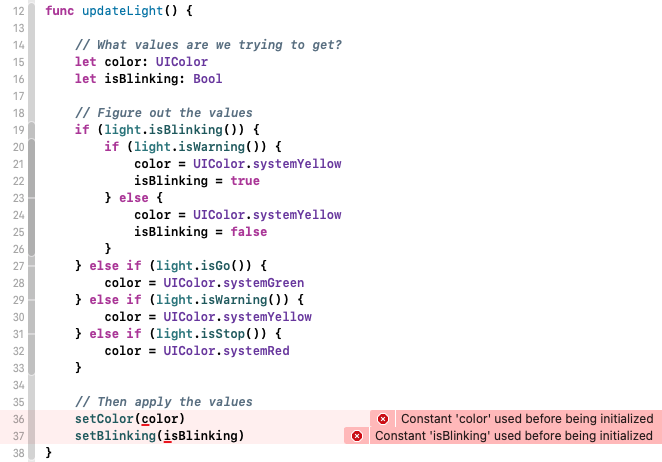
In Figure 2, I’ve arranged around this logic a pattern I use often in Swift. Before the “logic stuff” we make constants (with let) but do not assign them any value. After the “logic stuff” we use those constants.
And, right away, the compiler has build errors because there are some times where we did not set color or isBlinking. Perfect, the compiler is now helping me see that I have bugs! I just have to fix up the problem. Oh I see, I didn’t set isBlinking to false in these other if statements. That’s why the stoplight would keep blinking!
Ok, I’ve cleaned that up by adding isBlinking = false everywhere.
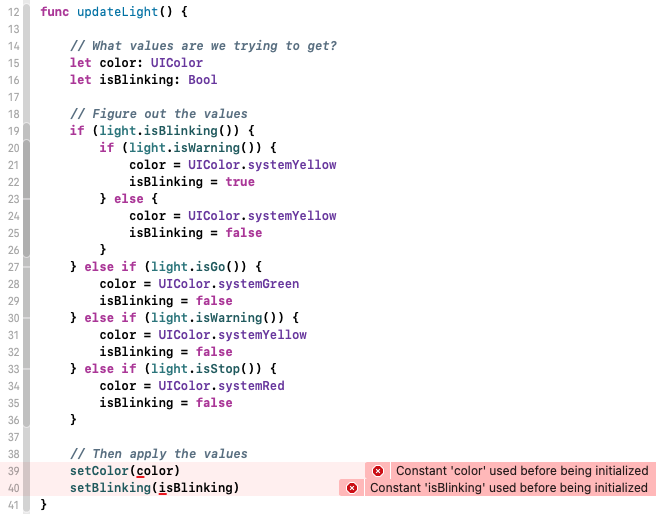
We set color and isBlinking in all of these cases, so we’re done. But wait, the compiler is still giving me build errors?! This is wonderful! The compiler found a bug for me that I couldn’t see. So what is it? If all of my if statements are false, then nothing sets color or isBlinking, so I’ll add an else at the end of all of this. But what should I do if the light doesn’t really have a setting for go or warning or stop? I don’t know what to do.
If this were on a project, I’d start asking questions.
If this were on a project, I’d start asking questions. Will we ever have stoplights with different colors? What is the standard behavior for a newly installed stoplight? And just like that, the Swift compiler has helped me find something I didn’t think about and gave me the right questions to ask.
For this example, I’m going to say that a light we don’t know what to do with should be a blinking red light.
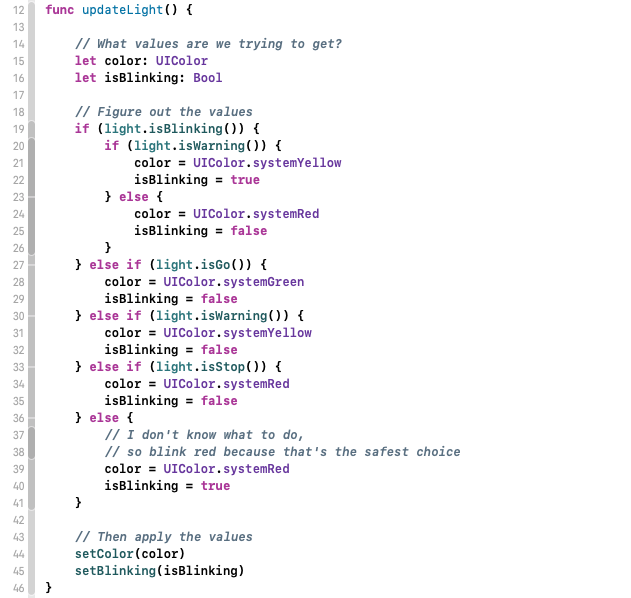
This one builds! So if I’m not sure what to do with the light, I’ll just set it to blinking red. Then it acts like a stop sign and that feels like the safest choice.
This code looks too complicated and it’s giving these weird extra cases. I think I can do better.
Switch to the rescue
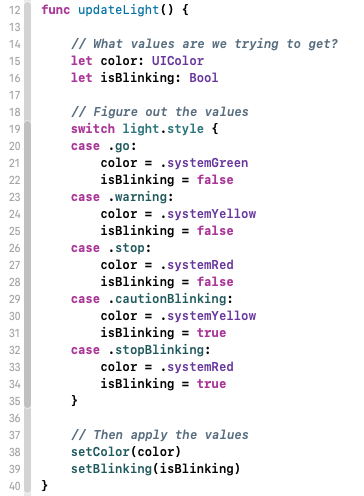
Whenever I have a few if statements inside each other, there’s often a better way to handle that with a switch. So let’s use a switch to clean it up a bit.
This feels a little better, because now I’ve got the go, warning, stop handled. I can make sure we don’t do blinking green, and it’s a bit clearer that we are handling the weird case of “none of the above” by setting to blinking red instead.
I get compiler errors for every switch so I know exactly where I need to go update my code
Switch statements are available in almost every coding language, but in Swift, the complier enforces that you provide a case for every possibility. This is the most useful when you use types that only have so many values. I use Switch with my own enums all the time, and then when I add a new case, I get compiler errors for every switch so I know exactly where I need to go update my code and think about how to handle that new case.
In fact, I’d like to make an enum to make the different “modes” or styles of the stoplight into a simple list of options. Let’s make a “style” attribute on the light and then my switch statement becomes a switch on one only the style. I also didn’t define anything that means “blinking green” and I don’t have to handle the “I don’t know what to do” case because the enum has exactly (and only) the 5 possibilities for the light. When I make a new light, I’ll set the style to .stopBlinking and I’m all set.
Ok, we finally finished, right?
Well… this is certainly much better than what we started with. We handle all the cases. We’ve factored out the bugs we had before, and we’ve made the enum type to handle the specific list of cases we cared about.
But, our code got longer, and maybe I need to use color or blinking information about a light somewhere else.
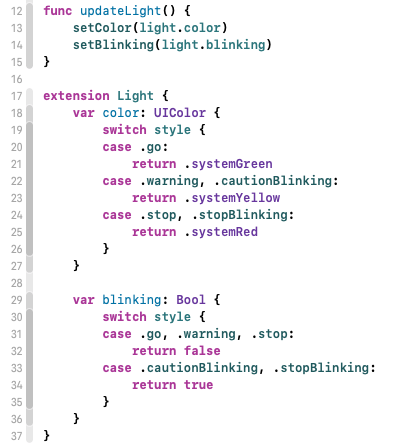
Figure 7 has the approach we end up with. This uses extensions to add the color and blinking generated variables to the Light, and now we can use those from elsewhere in our code. Each extension does a switch, so if we do add a new style for our stoplights (blinking green?, different colors, arrows?), the Swift compiler will help us see what we need to think about and change.
If you use a switch with an enum, but not providing a default, if you change the enum, then the compiler will show build errors thru your code so you can see exactly what you need to change.
always do your future self a favor
Some extra benefits of this being an extension on the Light is that color and blinking can now be found by future developers (always do your future self a favor — even if you aren’t sharing your code), because they are variables on the Light itself. Just take myLight. (press esc) and see the blinking and color come up as options.
Summary
We’ve used unassigned lets before code to make sure we assign the value we want in some if logic. We used a switch statement to flatten out the if statements. We used a custom enum to make our short list of possibilities. We used extensions to split up some overlapping ideas, make the code available elsewhere, and keep it close to the actual type so it can be discovered more easily.
When you use the Swift compiler to your advantage, it can guide your code to find and handle all the possibilities of what can happen.